


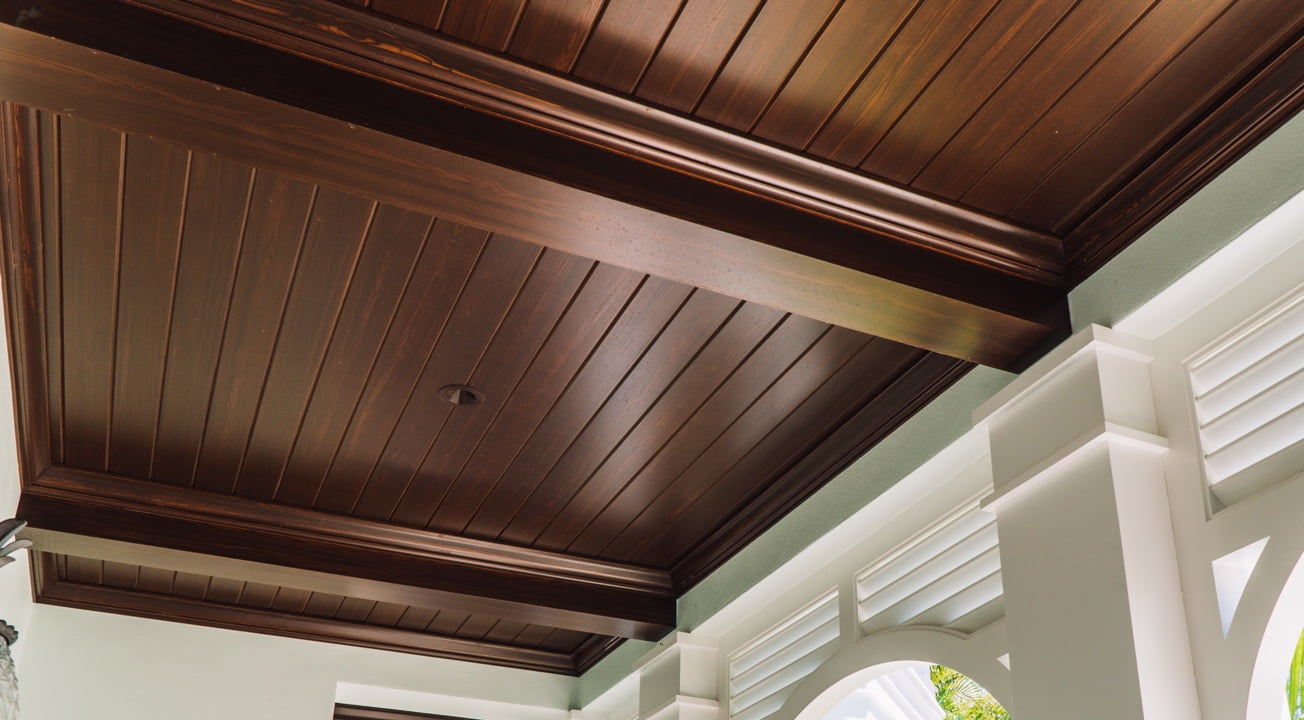
Using tongue and groove joints for ceilings are becoming an increasingly popular phenomenon for porch ceilings and interiors alike! The natural wood elements of tongue and groove ceilings provide a classically warm, authentic ceiling design, and it can also provide a great cover up for an ugly ceiling.
Table of Contents
- 1. What Is A Drywall Ceiling?
- 2. How Are They Installed?
- 3. What is a Tongue and Groove Ceiling
- 4. Tongue and Groove vs. Drywall Ceilings
- 5. Installing a Tongue and Groove Ceiling
- 5.1. Materials and Tools needed
- 5.2. Add Battens to the ceiling
- 5.3. Prep and stain the Tongue and groove boards
- 5.4. Cutting the boards
- 5.5. Nailing the boards in
- 5.6. Beat the Joints in
- 5.7. Other tasks
- 6. Cost of Installation
- 6.1. Ceiling area
- 6.2. Quality of Material Chosen
- 6.3. DIY or Labour
- 6.4. Cost of Other tasks
- 7. Conclusion
1. What Is A Drywall Ceiling?
Firstly, it’s important to distinguish the difference between the more conventional drywall ceiling and a tongue and groove ceiling. What primarily makes a tongue and groove ceiling different from a drywall ceiling is that it can be done as a DIY project, whereas drywall ceilings usually require professional help.
Secondly, a tongue and groove ceiling is made entirely of natural wood with a far more straightforward installation process.
Drywall ceilings, also known as plasterboards, are used mostly in home and office buildings. They are inexpensive but their visual appeal does reflect this. Despite this, the materials used in drywall ceilings are extremely fire resistant, so they are quite popular.

2. How Are They Installed?
Drywall ceilings require professional installation due to their complex nature. Watch this video to see how exactly drywall ceilings can be installed. The basic installation process is that the boards are screwed onto construction planks on your ceiling.
You will want to make sure that you have the correct measurements for your dry wall boards, otherwise the process can be extremely laborious and time-consuming!
3. What Is A Tongue And Groove Ceiling
A tongue and groove ceiling consists of all-natural long wood planks that fit side to side (with the tongue joints inside the groove joints) across a ceiling. In comparison to drywall ceilings, this process has a more easy installation procedure whilst producing much more decorative and aesthetically pleasing results!
Tongue and groove ceilings are simple and inexpensive to install, and great results can be achieved whether you hire a professional to install the ceiling, or you D.I.Y it!
4. Tongue And Groove vs. Drywall Ceilings
Tongue and groove ceilings differ greatly from drywall ceilings, which is mainly due to their finished looks and installation process.
Tongue and groove ceilings are more straightforward to install than drywall ceilings, though the latter ceiling style is easier to paint. Furthermore, tongue and groove ceilings are better at creating great visual appeal for your ceiling design in contrast to dry walls, due to the warm authentic look that adding natural wood elements brings.
We have listed the main pros and cons of each type of ceiling, to help you to decide which type of ceiling would suit your room more!
Pros and Cons of Drywall Ceilings
Pros
- Drywall ceilings can achieve flat and smooth surfaces for your ceilings.
- Drywall is easy to paint once it has been installed when compared to tongue and groove wood boards.
Cons
- Drywall ceilings can be difficult to install as they require upside-down mudding of drywall joints, which means you will most likely have to pay for a professional.
- Light reflections easily catch the drywall and have the potential to expose any installation or paint imperfections.

Pros and Cons of Tongue and Groove Ceilings
Pros
- Tongue and groove boards are easier to lift due to their lightweight. This means that you can hold them in place until they are successfully fitted.
- The natural look of a wood ceiling has some imperfect textures and consistencies. This means that any substandard painting or mistakes within the installation process will not be as noticeable as they would on drywall surfaces.
Cons
- All of the painting on the tongue and groove ceiling is done overhead, which can be tricky.
- The upkeep of wood on ceilings requires high maintenance. Luckily, HB Elements has you sorted with their Element Stain Series! These are beautiful wood stains that protect exterior wood from harsh climate extremities.
5. Installing Tongue And Groove Ceiling
A Tongue and groove ceiling can be installed as a DIY project. Therefore, should you choose to undertake the project yourself, follow these installation step-by-step instructions!
-
5.1 Materials and Tools needed:
You will need the tongue and groove boards, a measuring guide, a step ladder, battens, nails, a 15-Gauge Brad nailer, a hammer or nail gun, and a drill for nail holes.
-
5.2 Add Battens to the ceiling:
First, you will want to install battens into the vaulted ceiling. According to Family HandyMan, it is best to install 1×2 battens and fasten them directly to the framing with 2-1/2-inch screws. These battens will be the basis of your tongue and groove boards.
-
5.3 Prep and Stain the Tongue and groove boards:
Make sure you have stained the tongue and groove boards unless you want to make a lot of mess by painting upside down! You can use HB Elements fantastic Elements Stain Series for this.
-
5.4 Cutting the boards:
For a more professional-looking installation, whilst preparing the next board, use a technique called V-grooving. This is when you add a 45-degree bevel, called a chamfer. The V-groove will mask any irregularities in the butt joints.
-
5.5 Nailing the boards in:
Nail the tongues into the battens, with the tongues pointing in the direction of installation.
-
5.6 Beat the Joints in:
Push the tongues and grooves together. They may not always naturally lay flat so don’t be afraid to beat them in place!
-
5.7 Other tasks:
Make sure you consider any extra painting or decorating add-ons, and especially make sure to account for electrical work in your ceiling.

6. Cost of Installation
There are several factors affecting cost. Depending on the type of quality and type of material used, it can cost up to $2-$3.50 per square foot.
-
6.1 Ceiling area
The larger the ceiling, the more boards that will be used. This can be more expensive.
-
6.2 Quality of Material Chosen
The larger the ceiling, the more boards that will be used. This can be more expensive.
-
6.3 DIY or Labour
If you decide to employ professionals, this will cost more than performing a D.I.Y job. Alternatively, if you mess up your D.I.Y installation, it may be more expensive to have it fixed!
-
6.4 Cost of Other tasks
Calculate the costs of any paints, stains, or ceiling decor that you want to include.

7. CONCLUSION
In summary, tongue and groove ceilings offer a range of benefits when compared to other ceiling types, like drywall! To install tongue and groove ceilings in your new house is a relatively straightforward task that, with the help of our guide, can be completed quickly and safely.